.png)
Agents
Overview
The Agents module allows the creation and management of agent profiles, where an agent is a contact centre employee who is responsible for external interactions, and who is registered to use the Agent Toolbar or CTI Adapter as their interface.
An agent profile informs the contact centre software about what accesses and permissions the agent has been granted when logged into the Agent Toolbar.
Where to find the Agents module:
Open the Workspace
Select Agents from the Administration menu
1. Display Agents
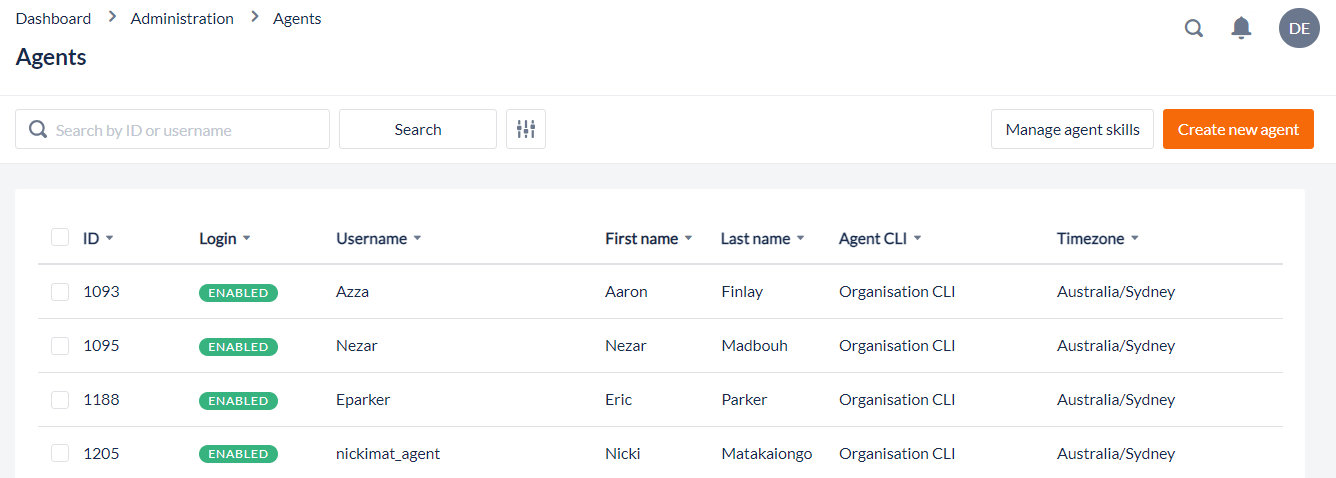
A list of agents is displayed when you first open the Agents module.
For each agent, the list displays the following details:
Column | Contents |
|---|---|
 | Click the Selection Checkbox to select the agent. |
Agent ID | The unique identifier for the agent |
Login   | Indicates the login status of the agent. The enable/disable control is located in the Agent’s Login Settings 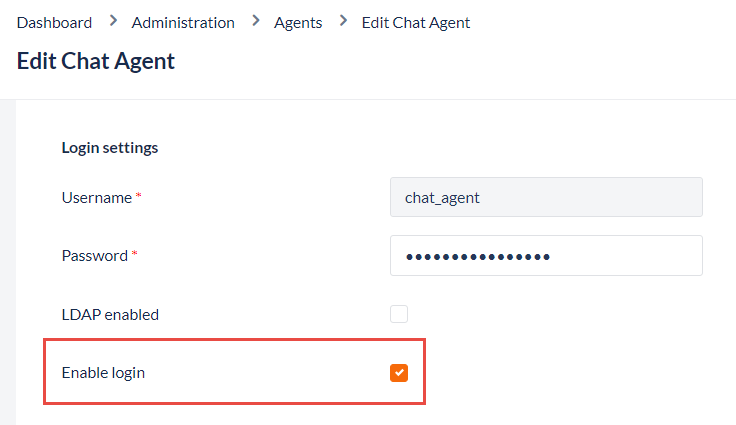 |
Username | The username defined for the agent and used for agent login |
First Name | The First Name of the agent is displayed |
Last Name | The Last Name of the agent is displayed |
Agent CLI | If a CLI number is assigned it is displayed; otherwise, the Organisation CLI is the default CLI |
Timezone | The Timezone in which the Agent is located |
 | The Options icon appears if the mouse pointer is located above a row. If this is clicked, the options to Edit or Delete are shown |
2. Search Agents
Initially, there is no filtering applied to the list of agents and two search options are presented:
Quick Search
If the Agent ID or Username is known, enter it, or a part of it, into the Quick Search field and click the Search icon to locate the agent with that ID.Advanced Search
This advanced search feature allows you to reduce the list of agents displayed by adding one or more search filters.
Click Advanced Search to open the advanced search options.
Enter the search filters and click Search.
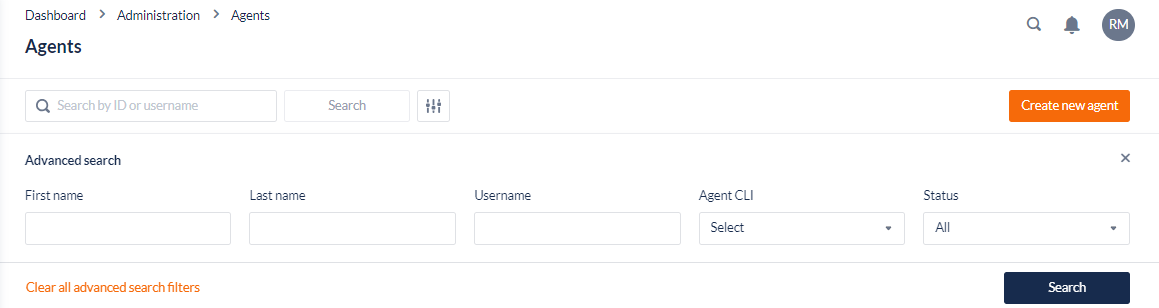
The search filters include:
Field | Description |
|---|---|
First Name | Enter the first few characters or all of the first name |
Last Name | Enter the first few characters or all of the last name |
Agent User Name | Enter the first few characters or all of the User name |
Agent ID | Enter the first few digits or all of the Agent ID |
Agent CLI | Select a CLI of the Agent from the drop-down list |
Agent Status | Select from All, Active Only, or Inactive Only |
3. Add a new agent
Open the Workspace
Select Agents from the Administration menu
To create a new profile, click the Create New Agent button in the header
To edit an existing profile, click Edit under Options (breadcrumbs) that is visible to the right of the record when you hover over the row
Input the new agent's details as described in the following table:
Settings | |
First Name | Enter the Agent first name. Use only alphanumeric characters and spaces. An apostrophe or hyphen is permitted |
Last Name | Enter the Agent last name. Use only alphanumeric characters and spaces. An apostrophe or hyphen is permitted |
Enter the Agent's email Address | |
Connection Mode | Choose between Call me to Connect, Call in to Connect, or Web Connect. This setting will be presented as the default on the login dialog on the Agent Toolbar however the agent can alter the setting to suit their need at the time |
Connection Persistence | When checked, the connection between the agent and the system is maintained between agent/contact interactions. This setting will be presented as the default on the login dialog on the Agent Toolbar however the agent can alter the setting to suit their need at the time |
Default Phone Number | Enter the default phone number for this agent. This setting will be presented as the default on the login dialog on the Agent Toolbar however the agent can alter the setting to suit their need at the time This is only required if the agent’s default connection mode is set to Call me to Connect |
Login Settings | |
Username | The Username must be a unique identifier. It can contain alphanumeric characters and the following special characters are accepted: ! @ # $ % ^ \ & _ . |
Password | The Password must comply with the password policy established by the Administration Team, and as set in Organisation Settings. Clicking “Generate Password” will enable the user to set a randomly generated password that complies with the password policy. 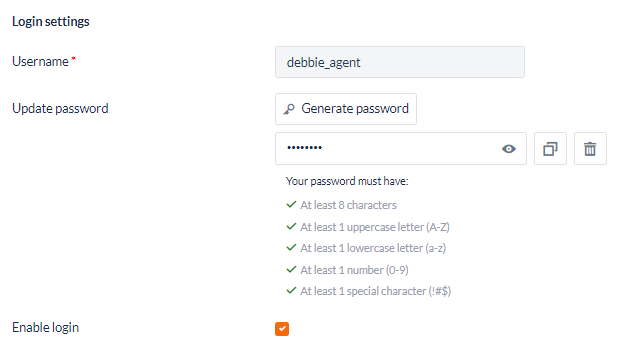 The agent will be forced to update their password at first login after setting up a new password from the Workspace. |
Enable Agent Login | Enables the agent to log in. The default setting is enabled
|
Multi-factor authentication Multi-factor authentication settings can only be configured at the Agent/User level. | |
Time-based one-time password (TOTP) | Time-based one-time password (TOTP) is a algorithm which generates a one-time password (OTP) that uses the current time as a source of uniqueness. 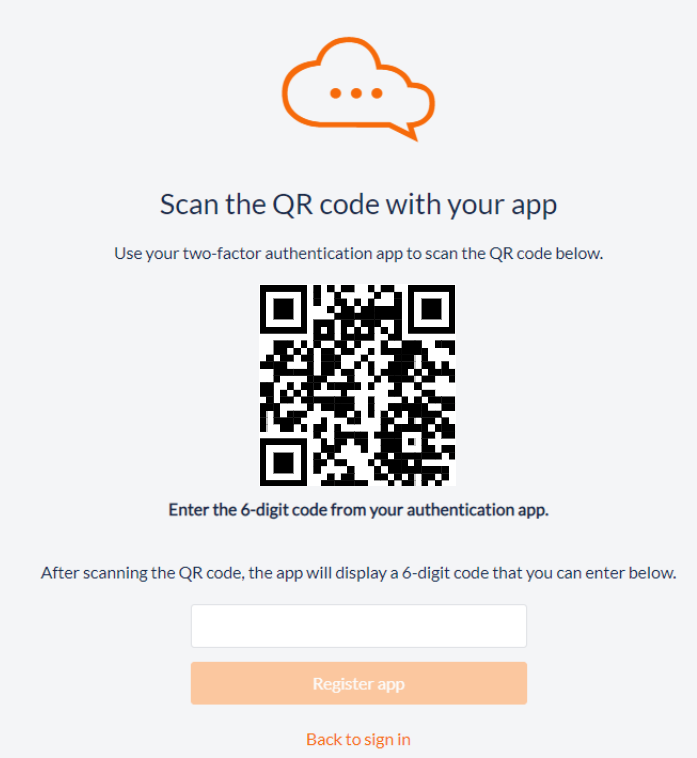 Once the application has been successfully registered, from then on the Agent will be presented the following screen to Authenticate their access when logging in to the Toolbar: 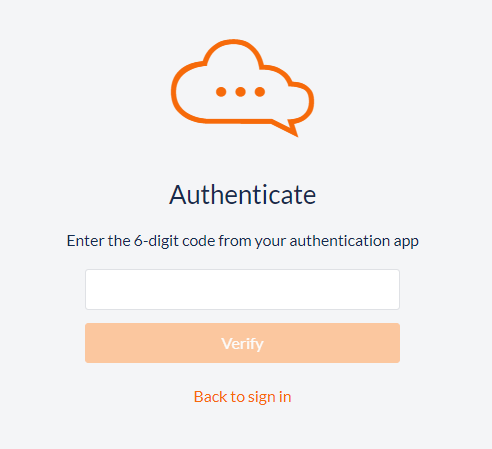 |
Web Authentication (WebAuthn) | The Web Authentication API (also known as WebAuthn) is a specification written by the W3C and FIDO, with the participation of Google, Mozilla, Microsoft, Yubico, and others. The API allows servers to register and authenticate users using public key cryptography by integrating with built-in device authenticators such as Windows Hello. Once enabled, the Agent will be presented the following screen to configure the two-factor authentication: 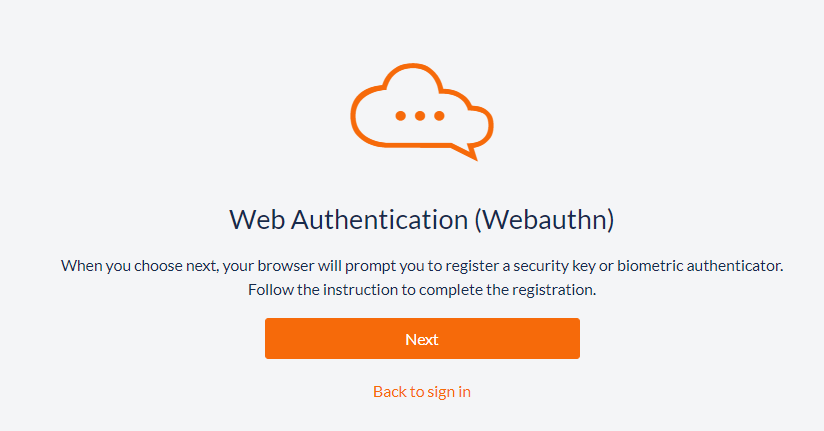 When moving to Next, the Agents' credentials are verified where they will be required to enter their device password, PIN or biometrics: 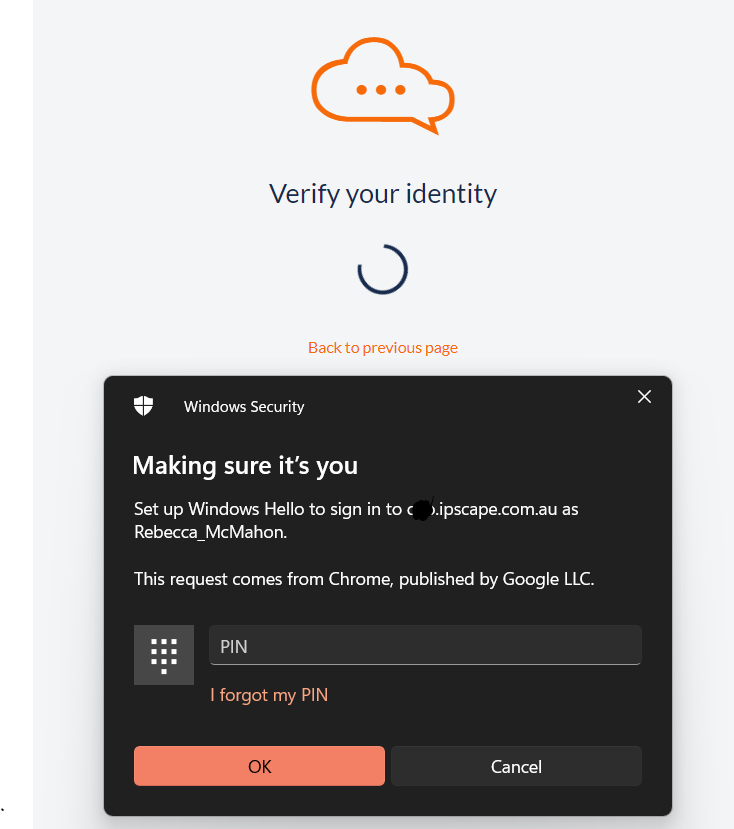 Note: This will timeout after approximately 60-seconds and the following error will be displayed. The Agent will need to return to the previous screen to restart the verification: 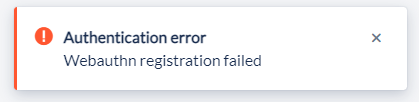 |
Chat | |
Maximum active chats | Set the number of concurrent chats in which an agent is allowed to participate. Select between one and five. |
Display name | Enter the name to be displayed on the Chat widget as the Agent Display Name to customers |
Job description | Enter a role description for the Agent on Chat Interactions. This will be displayed on the Chat widget to customers under the Display Name |
Avatar | Click on Choose File to browse for the image that is to be used for this Agents avatar. |
Timezone Settings These settings are used when displaying times for events that are specific to the agent - for example, the agent's last logged in date and time. The fields in the drop-down lists are those used in the IANA Timezone database (see IANA Timezone database). | |
Region | Enter the region in which the agent is located from the drop-down list |
Timezone | Enter the timezone in which the agent is located from the drop-down list |
Assignments | |
Teams | View or edit the assigned teams for the agent. Teams can be assigned by typing the team name to select from the dropdown and unassigned by clicking the A Team must be created before agents can be assigned |
Campaigns | Any campaigns assigned can be configured or viewed here under the appropriate priority. Campaigns can be assigned by typing the campaign name to select from the dropdown and unassigned by clicking the A Campaign must be created before agents can be assigned |
Agent Permissions | |
Pause Reasons | Ensure the checkbox is checked to enable the presentation of a list of pause reasons to the agent when they click on Pause. The agent can select a pause reason from the list but may not be required to do so In Resources > Toolbar > Pause Reasons, there is a control that enforces a valid agent pause reason. |
Lead Manager | Ensure the checkbox is checked to allow this agent to open the Lead Management dialog in which they can specify a campaign name and search the leads imported to that campaign |
Callback List | Ensure the checkbox is checked to allow this agent to open a list of Agent Callbacks assigned to them that are due on that calendar day. This display is view only |
Receive transferred calls when paused | Ensure the checkbox is checked to allow the agent to receive call transfers from other agents when they are in the paused state |
Email Search | Ensure the checkbox is checked to allow the agent to search for an email from the agent toolbar, as described in Search for referenced emails in Agent Toolbar |
Agent Call | Show or hide the Agent Call button that opens a popup window that allows the agent to make an internal call to another agent or supervisor in their assigned Team via the Agent Toolbar |
Manual Call | Ensure the checkbox is checked to allow the agent to conduct manual calls via the Agent Toolbar. |
Agent CLI | Select a specific Caller Line Identification (CLI) number for the agent or set the default Organisation CLI from the drop-down list This number will be used for every campaign with which the agent is associated. It will override any Campaign CLI and the Organisation CLI |
Show number of interactions in queue Click the checkbox below each of the following display options to hide or show them in the agent toolbar: | |
Calls | Show or hide the number of voice calls waiting in the queue for all of the Inbound campaigns to which this agent is assigned |
Show or hide the number of emails waiting in the email queue for all of the email campaigns to which this agent is assigned | |
Chat | Show or hide the number of chat requests in the chat queue for all of the campaigns to which this agent is assigned |
Campaign Access | |
Running Outbound Campaigns Only | Ensure the checkbox is checked to set the agent's display to show only outbound campaigns during a Manual Call |
3. Setting up a Direct In Dial (DID) for an Agent
There are 3 main elements that you need to configure:
Assign the phone number to the Agent
Choose or create a campaign that you want the call to be associated with for reporting purposes. This campaign will also define the settings that apply to the call like if the call is recorded and what Wrap Codes available to be added to the phone call
Create a workflow that defines what happens if the Agent on pause or logged out (for example diverts to voicemail or another phone number)
Configurations steps
These steps explain how to set up a DID for an Agent that will divert to voicemail if they are not available:
Create/Edit the Agent – ensure that their email address is filled in (this will be used to send an email to the agent with the voicemail recording attached if the agent is not available). Go to Administration>Agents
Create an Inbound Campaign, assign Wrap Codes, and add the agents you would like to have a DID functionality. Go to Campaigns>Configuration, Wrap Codes, and Queues
Ensure you have an email channel set up (go to Channels>Email)
Create an email template and ensure that the ‘Destination Type’ is ‘Agent email’ (if you do not see this field contact ipSCAPE and ask them to enable DID functionality). Go to Resources>Email Templates
Create a Workflow select the ‘Capture Voice’ object. Go to Resources>Workflows
Assign a phone number to the Agent. Go to Channels>Voice and select Use as Agent Direct in Dial number
4. Agent Extensions
The native ipSCAPE agent extension allows agents to establish a connection with our voice servers rather than a third-party PABX or other landline.
This is an ‘on-net’ connection which means there is no charge for agents regardless of whether they are using ‘system calls agent’ or ‘agent calls system’.
Acts as a ‘light’ PABX extension
Free-agent leg connectivity – on-net calls – no call costs
For agent connectivity to the ipSCAPE environment only
Can be used in conjunction with agent DID (additional DNIS will be required for agent DID)
Compatible with a softphone or sip handset
SIP handset – register IP address & match it to the ipSCAPE agent extension
Configuring Agent Extension
Confirm the following with the ipSCAPE Helpdesk:
your ipSCAPE instance’s agent extension prefix
the prefix will be added to the beginning of the agent number to give you your agent extension
for example; where the agent id is 1427 & the prefix is 50143, the agent extension will be 501431427
your ipSCAPE instance’s agent extension password
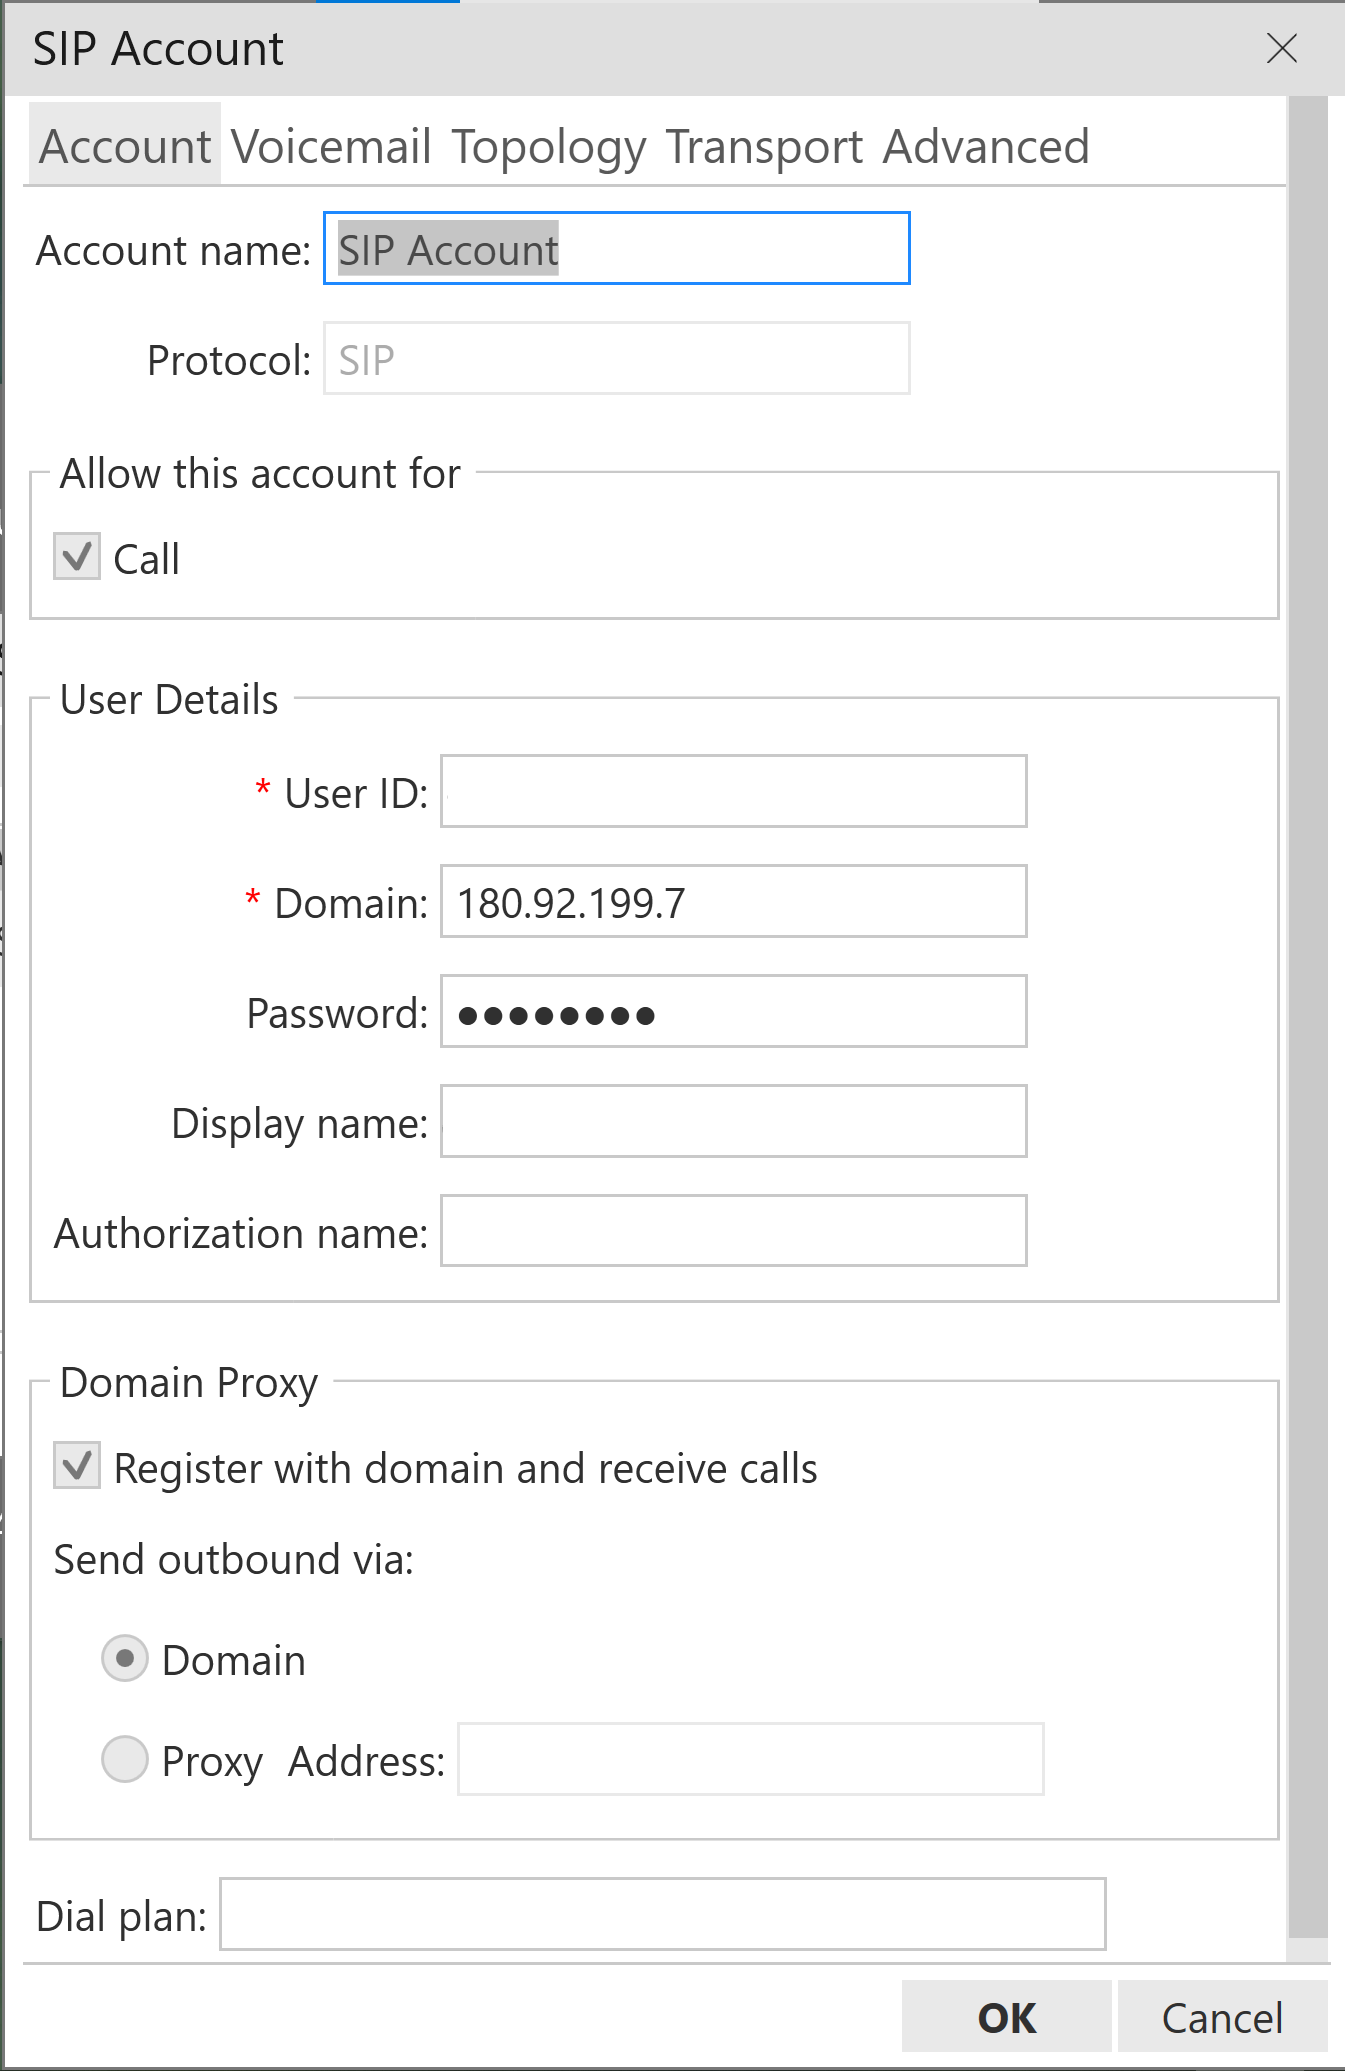
ipSCAPE SIP server settings
Associate your softphone or SIP handset with the agent extension, password & SIP server. For example:
Username / ID = 501431427
Password = 50738748
SIP Server / Domain = 180.92.199.7